Example Pier Import
Installing a new Pier instance can be done, but different steps are needed to upgrade a running Pier wiki. The overall export/import process is:
- Export data into a class
- Export history into a file
- Load the class data and create the wiki in a new image
- Read the history text
- Test the webserver
- Setup NginX for security
Listed below is an upgrade tutorial one can try out.
Steps for Exporting a Running Wiki
- Prepare the environment so mistakes like an out-of-date export are avoided:
 [localhost Pharo]$ mkdir -p old
 [localhost Pharo]$ mv PRKernelCreatorForPier.st history.txt pier_addons.image pier_addons.changes old/
and:
 [webserver Pharo]$ mkdir -p old
 [webserver Pharo]$ mv wiki.tgz old/
Files that do not exist can be ignored.
- Copy the image and changes file to a local machine where you can run
pharo-ui:[webserver Pharo]$ tar -czf wiki.tgz pier_addons.image pier_addons.changes
 [localhost Pharo]$ scp webserver:Pharo/wiki.tgz ./
 [localhost Pharo]$ tar -xzf wiki.tgz
- Start the image, if you are planning to share the export, then it is a good idea to reset the password first:
(PUUser allInstances detect: [ :user | user name = 'admin' ]) password: 'pier'.
- Load the latest Pier code, run this to open the upgrade tutorial:
ProfStef goOn: HowToSetupPier.
This should open:
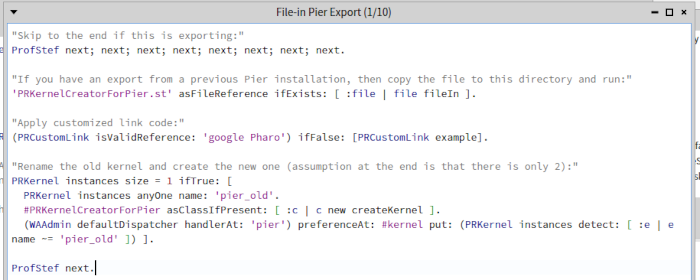
- Run the first lines by selecting it and choosing 'Do-It' (or
Control-d):"Skip to the end if this is exporting:" ProfStef next; next; next; next; next; next; next; next.
- This should skip to the
"Export the Wiki from a Running Image"page. Run all of the code on this page"Code for exporting:" | problemChars count | count := 0. (problemChars := Dictionary new) ...
If one encounters a port number parsing error on windows, check if it is attempting to write to a repository - it may be something that can be ignored.
- Also run the code on the following page to export the history.
- Generate the
PRKernelCreatorForPier.standhistory.txtfiles, copy these along with files to the destination directory
New Image Import
If you don't have a running pier instance, you can still practice with the Blog from this site. It can be downloaded from S3 at: pier_todo.tgz. As of this writing, Pier works on Pharo 11 and older - an example:
[jborden@localhost Documents]$ mkdir Pharo && cd Pharo
[jborden@localhost Pharo]$ curl -L https://get.pharo.org/64/ | bash
...
[jborden@localhost Pharo]$ tar -xzf pier_todo.tgz
[jborden@localhost Pharo]$ ./pharo Pharo.image save pier_addons
[jborden@localhost Pharo]$ ./pharo-ui pier_addons.image &
This should start Pharo, open a workspace (keys are Control-o Control-w) and a transcript (key: Control-o Control-t). Pharo code can be loaded by running:
Metacello new
  baseline:'Pier';
  repository: 'github://Pier-CMS/Pier3:main/repository';
  onConflictUseLoaded;
  load: 'todo'.
Next run:
ProfStef goOn: HowToSetupPier.
Instead of skipping to the end, run the step:
'PRKernelCreatorForPier.st' asFileReference ifExists: [ :file | file fileIn ].
This can take several minutes to run. Proceeded to run the other commands, including:
ProfStef next.
This should move to the "Production Pier Defaults". Also run the commands there and proceed further. The "Pier Libraries" step is related to the Javascript and theme libraries, it can be customized and ran. The "Secure the Seaside App" should have the password changed from the default 'seaside'.
The "Start Running Automatic Tasks" is setup for the pier import. For an other installs it is not necessary to run and can be skipped. The history import is dependent on what type of Persistency is used.
The goal of the "Image Cleanup" is to keep the Smalltalk server running as well as possible. Specific advice on the WAAdmin memory settings can be found on Pier Memory Settings. Removing the original pier instance should help with security and simplifies several automatic tasks.
Once the "Export the Wiki ..." page is reached, the wiki image can be saved. The wiki can be accessed through: http://localhost:8080.
Test Access
Before adding too many other parts, it is a good idea to test connectivity. While in the wiki image, open:
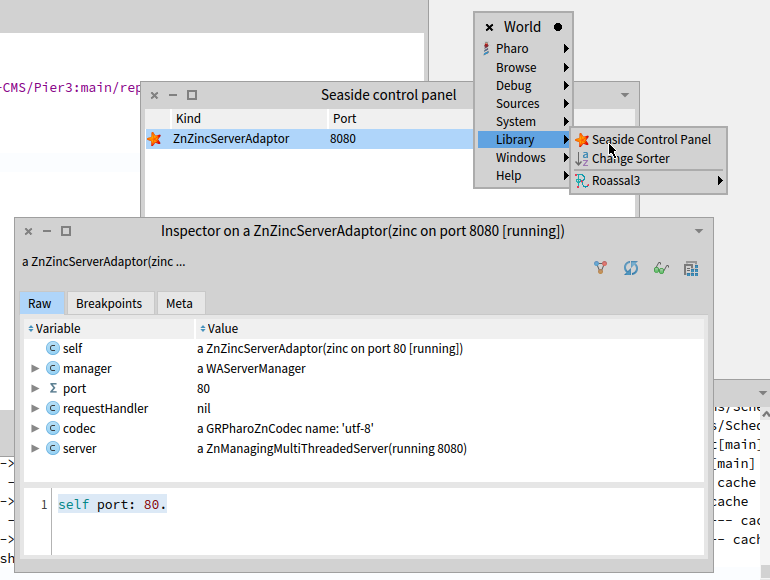
self stop; port: 80; start.
Running a webserver on port below 1024 generally requires administrator access. Copy the wiki image and changes to your webserver and start it there:
root@ip-123.45.67.89:~/Pharo$ ./pharo ./pier_addons.image --no-quit
Check that you can access the wiki - for this example it would be at: http://123.45.67.89 - several things that can help your troubleshoot:
- Did the web browser change to https? This should be using plain http
- check that it has the privilege to listen on port 80 - it may be necessary to run as root with
sudo - check network settings - AWS has security groups that default to deny access. Check that port 80 is open for incoming traffic
- For Ubuntu, check the firewall with
ufw status, more details are in this Digital Ocean tutorial
Don't be surprised if the "Check Image Save" page reports Transaction file does not exist!, this will be created when edits are done.
Since http traffic is not encrypted, it is not a good idea to login. Even if a VPN is used, the traffic between the VPN and the webserver will not be encrypted (only the traffic from the client to the VPN is secure).
In the image on your local server, update the seaside port to 8080. Save and upload the image.
Reverse Proxy
The next goal is to set up a reverse proxy to redirect port 80 to 8080 where Pier is listening.
An earlier https post describes acquiring certs from LetsEncrypt, this post shows self-signed keys suitable for testing.
Install NginX from source.
Once one has a DNS name, the it can be setup for Serving Pier with HTTPS (here are several good reasons why).
Install NginX:
[ec2-user@ip-172-31-26-77 ~]$ sudo yum clean metadata
[ec2-user@ip-172-31-26-77 ~]$ sudo yum -y install nginx
[ec2-user@ip-172-31-26-77 ~]$ nginx -v
nginx version: nginx/1.24.0
For Ubuntu, apt-get install nginx. Modify the config file:
[ec2-user@ip-172-31-26-77 ~]$ sudo vim /etc/nginx/nginx.conf
...
        include /etc/nginx/default.d/*.conf;

        location / {
                proxy_pass http://localhost:8080;
                proxy_http_version 1.1;
                proxy_set_header Host $host;
        }
...
[ec2-user@ip-172-31-26-77 ~]$ sudo nginx -t
nginx: the configuration file /etc/nginx/nginx.conf syntax is ok
nginx: configuration file /etc/nginx/nginx.conf test is successful
[ec2-user@ip-172-31-26-77 ~]$ cd Pharo
[ec2-user@ip-172-31-26-77 Pharo]$ ./pharo pier_addons.image --no-quit &
[ec2-user@ip-172-31-26-77 Pharo]$ sudo systemctl restart nginx
Another example is on the page NGinX in Front of Pier.
The check_pier.sh script can be ran in cron to keep it running.